Both Wix and WordPress are great choices for website design. They both provide built-in features, templates, and add-ons that can be of use to many organizations. Users without technological experience are able to use these website building platforms without learning how to code. When comparing the two, it is a matter of which features you would like which we have described in our WordPress vs. Wix blog.
Wix has limits to how much you can customize the appearance and functionality to the website. You're unable to add forms (CTA's) or featured images to blog posts on Wix. You're unable to switch your website template so if you decide to rebrand it may be tricky! And you can’t access or change the HTML of your site.
Advanced users or businesses looking to get the extra edge features that WordPress offers may want to use WordPress for its content management system (CMS) features. Below, we take a look how to convert your Wix website into WordPress.
Learn More -> Additional Ways to Increase Traffic to Your Website at a Low-Cost!

1. Acquisition new web hosting
Upgrading your website from Wix to WordPress will require you to purchase a new web hosting account. Once this purchase has been made, you’ll be able to install WordPress to your account.
2. Set up a temporary domain
You'll need to create a temporary domain on your WordPress side while you're still moving all the content over from your live Wix site. This is mandatory if you were using a premium domain on Wix and want to move that to WordPress.
3. Setting & plugins
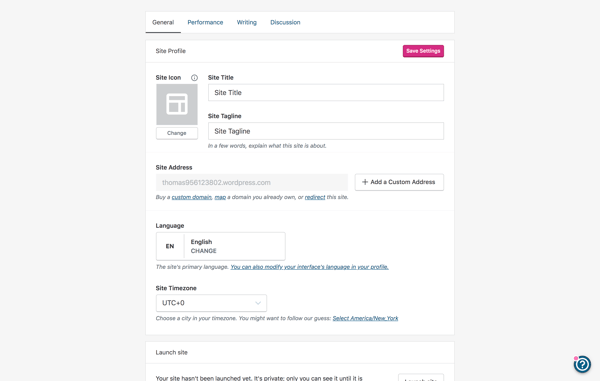
Remember to do some backend setup before customizing your website. In your WordPress account, you see your dashboard and navigate to the following once you get started:
-
Settings > Permalinks and update your url structure to make it more readable.
-
Settings > General create your site title and tagline.

While on your WordPress account, check out some essential plugins and their features as these can help your website to perform better in terms of higher SEO rankings.
4. Customize and design your needed website
Next step is to customize your website design. This is exciting as WordPress offers thousands of themes to help get you started. The templates provided may not be exactly what your business is looking for. At acorn30, we offer a free consultation and would be able to provide solutions to designing your website.
5. Transfer blog and website pages
Transferring your blog can only be done manually or through paid services with website experts. The length of time it will take for the full transfer depends on the size of your site and the pages and content you have to publish.
View Now -> Signs Your Website is Out Of Date

6. Transfer domain name to new provider
If you had a premium domain registered to Wix, you’ll need to transfer that once your site has been migrated.
-
Sign into Wix
-
Navigate to Subscriptions
-
Click domains in the dropdown
-
choose the relevant domain
-
Select the Advanced tab
-
Choose transfer away from Wix
-
Click send code
-
You will receive an authorization link via email to transfer to WordPress.
It is encouraged to use tools to check for responsive web design once your website is completed. Responsive website design can be overlooked. The more interactive your site is to help the consumer, the more they will engage with you. On average, a consumer will look at two pages. Within those two pages, the consumer will have a rough idea of what your business is about. Therefore, ensuring your website is responsive the moment a prospect lands on your page would be ideal.
View Now -> Steps for Responsive Website Design
Upgrading your website from Wix to WordPress may seem like a challenge, however once done you would be able to utilize all of WordPress's extra features that may lead to generation for your business.